By Chef Alli on May 10, 2021
How to Cook Steak in a Cast Iron Skillet

Thank goodness there’s more than one way to cook a good steak. We often think steak should only be grilled, and that couldn’t be more incorrect. Go ahead and resign yourself to this: a nice thick steak, seared and cooked in a cast iron skillet, is one of the most pleasurable pieces of tender, juicy beef you’ll ever enjoy.
Take these tips and you’ll be cooking a mouthwatering steak in no time. No grill needed!
Choose the Right Steak
Sometimes standing before the butcher case feels super intimidating—all those cuts of beef and all those choices. It can be so confusing and overwhelming.
And simply choosing the beef with the highest price tag doesn’t guarantee you’ll be eating the cut that’s right for you.
Recognizing what to look for by “beefing” up your steak knowledge before you land at the meat case will give you more “rare and well done” confidence for choosing the right steak.
As a rule of thumb, always watch for specific words in reference to the cut of steak, such as strip, loin or rib. These cuts come with significant marbling, thus good flavor, making the cooking process easier.
Among these steaks would be a rib-eye steak, strip steak (usually called New York or KC strip), top loin steak and tenderloin steak (also called beef fillet).
T-bone steaks are well known and popular and are comprised of two different steak cuts that are attached to the T-bone in the center. On the long side of the T-bone is the strip steak, while on the smaller side of the T-bone is the tenderloin.
And don’t forget the porterhouse (a great steak for two) which is the thicker and more massive version of a T-bone steak.
For a novice cook, I highly recommend starting out with a couple of rib-eye steaks. Thanks to its elevated level of marbling, it is a very forgiving cut of beef. Even if you happen to overcook it, a rib-eye steak will still be juicy, thanks to more fat (marbling) within the muscle.
Prepping
Upon removing the steak from the fridge, unwrap all the packaging from the beef, placing the steaks onto a rimmed sheet pan or platter. Using paper towels, pat the surface of the steak well to remove any moisture on the exterior.
Brush the steak with a bit of olive oil over both sides to form a bit of a seal, then liberally season both sides of the steaks with kosher salt and freshly ground black pepper. This seasoning will adhere to the exterior of the beef so you can enjoy a delicious, crunchy crust.
Salt and marbling bring out flavor in meat. The salt also helps caramelize the steaks, forming that crispy crust we all yearn for. If you have time and have planned ahead, let the seasoned steaks rest in the fridge, uncovered, for up to 24 hours—this enables the steaks to create the ultimate crusty exterior when cooked. This technique is definitely worth the time if you have it.
Before and After Beauty Rest
Beauty rest for beef is absolutely essential, yet so easy to skip because life is so hurried. And when you’re hungry, who wants to wait around, right?
I can tell you with absolute confidence and experience that beauty rest (always at room temperature) is the single biggest thing you can do to guarantee you’ll be dining on a steak from heaven.
First of all, beauty rest allows the juices at the center of the steak to make their way to the outer edges of the beef, allowing that succulent slab of beef to cook much more evenly.
And beauty rest for beef ensures that you achieve that hot sear that makes caramelization.
Once your steak has enjoyed adequate beauty rest, the marriage it makes with a smokin’ hot skillet will be quite glorious.
And don’t forget beef also needs beauty rest following the cooking process. When my steak hits the internal temperature I desire (we choose 125-130 degrees F.), I remove the cast iron skillet from the heat, loosely tenting the skillet with a sheet of foil, allowing the steaks to rest.
This respite (yep, beauty rest) in the skillet lets the steaks raise to the ideal finished internal temperature of 140-145 degrees F. for a nice medium-rare steak that’s relaxed, juicy and tender.
Beauty rest following the cooking process is very important since it allows the protein fibers of the steak to relax, safeguarding that deliciously tender and juicy eating experience we all long for.
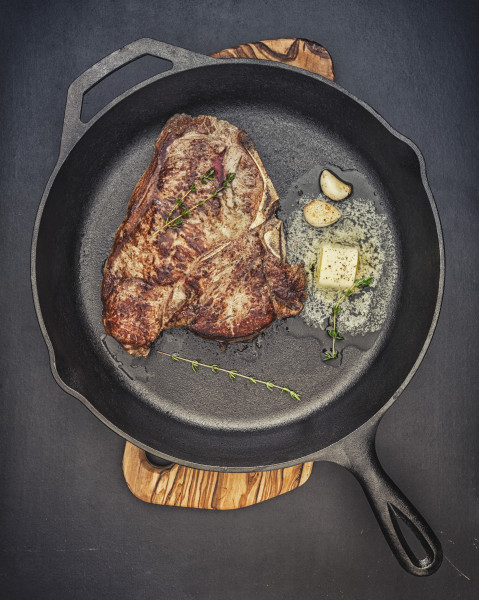
Why Cast Iron?
Flimsy cookware is not for cooking steak. Steak needs to be pan-seared and that means you need a good, heavy-duty skillet to accomplish the task. A 12-inch cast iron skillet (I use a Lodge cast iron skillet) is the perfect-sized vessel for cooking two large rib-eyes very nicely with no crowding.
Because cast iron has superior heat conduction, it distributes the heat very evenly throughout, creating that consistent crust over the entire exterior of the steak. Once the cast iron skillet is removed from the heat surface, it still holds the heat well and allows the steak to rest and relax at the same time.
Preheating is Key
Pan searing is a classic cooking technique in which the surface of the steak is cooked undisturbed in a very hot (cast iron) skillet until a crisp and flavorful crust forms on the exterior. It’s the key to building the ultimate flavor profile and also prevents the steak from sticking to the skillet.
To know if your skillet is properly preheated and ready for your steak, drop a couple of small water droplets into the center of the greased pan. If you hear sizzle and those droplets “dance” like crazy, your skillet is hot and ready to receive the steak.
Once the steak is nicely seared on each side, it’s time to reduce the temperature. This temperature reduction prevents the exterior of the beef from burning and at the same time, affords the steak an opportunity to cook toward its center.
No Overcrowding
To properly sear a steak, be sure it has ample cooking room. If your skillet is overcrowded with too many steaks, heat is prevented from circulating properly and results in a “steamed” steak.
Instead of that beautiful caramelization on the exterior, the steak will be what all steamed meat looks like: gray, funky and unappealing.
Once you place your steaks into the hot and ready skillet, make sure to peer down into the skillet to ascertain that you can see the bottom of the pan. If you can’t, that means your skillet is overcrowded.
Let it Be
For proper searing of a steak, you must leave it alone so the skillet can do its job. If you are constantly picking up the steak or moving it around in the skillet, that longed-for crusty exterior and browning can’t form.
Be patient! Let that steak sit there and sear itself to a happy state of caramelization on the first side, then do the same on the second. Keep your tongs to yourself until that steak is good and ready to flip. Don’t rush it.
Temping
Cooking by sight leaves way too much margin for error.
I know a lot of cooks who employ the “cut and peek” method. Sadly, this method allows too much of those precious juices to escape from the interior of the steak every time it’s cut open.
These (bad) habits can be avoided by learning to use an instant-read meat thermometer. It takes out all the guess work.
When temping a steak, come in from the side, making certain the thermometer stops at the center of the steak, never touching any bones or the bottom of the skillet. Once the dial stops moving, this is the internal temperature of the steak.
If you desire a steak that’s medium rare (140-145 degrees F. internally) remove the skillet from the burner as soon as the steak reaches 125-130 degrees at the center. Because there is always residual cooking that happens immediately following the cooking process, the steak will continue to raise in temperature another five to 10 degrees.
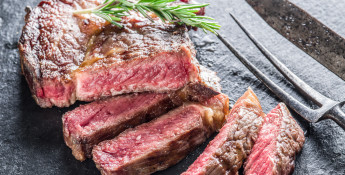
Slicing
To be certain sliced steak is tender, always slice it across the grain, never with the grain. Slicing across the grain shortens the protein fibers of the steak, allowing a much more tender bite and eating experience.
To find the grain of the beef, lay the cooked steak onto a large cutting board. Check the steak to see which way the grain is running.
Next, take your favorite sharp slicing knife and cut across the fibers of the meat (the grain) on the bias. Cutting at a slant (on the bias) also helps keep the protein fibers of the steak shortened so the slices are more tender.