By Chef Alli on November 22, 2019
13 Ways to Use Freezer Bags
Making kitchen chores faster, easier and better!
I love a handy freezer bag. These heavy-duty plastic bags make so many cooking chores much quicker, easier and far less messy, helping me be more efficient in the kitchen. I also like the more durable construction of freezer bags versus regular plastic bags since that extra sturdiness helps eliminate mishaps as you put the bags to use.
Piping Bag for Frosting
A freezer bag provides a wonderful, easy way to pipe icing over your favorite baked goods, such as warm cinnamon rolls from the oven or cupcakes. Fill a portion of the bag with icing; using scissors or kitchen shears, snip off a corner of the bag, then gently force the frosting in the bag through the corner exit and onto your baked goods.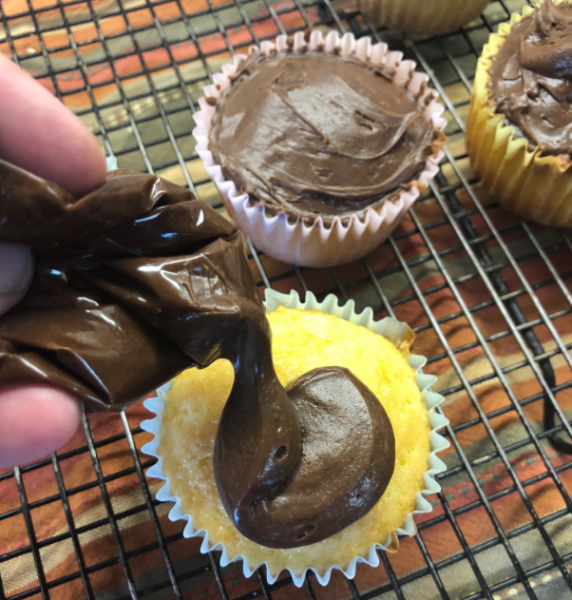
Garnishing Bag for Melted Chocolate
One of the handiest uses of a quart freezer bag is for melting small amounts of chocolate to use for garnishing. Place a handful of chocolate chips into a quart freezer bag; using 50% power, microwave the chocolate chips in 30 second increments just until the chocolate chips are warm (not hot) and melted, massaging the bag and the chocolate after each interval to smooth it out. Using your kitchen shears or scissors, cut off a very tiny portion of one corner of the bag. Press the melted chocolate through the exit in the corner, zigzagging it in a decorative pattern over the dessert or plate you wish to garnish.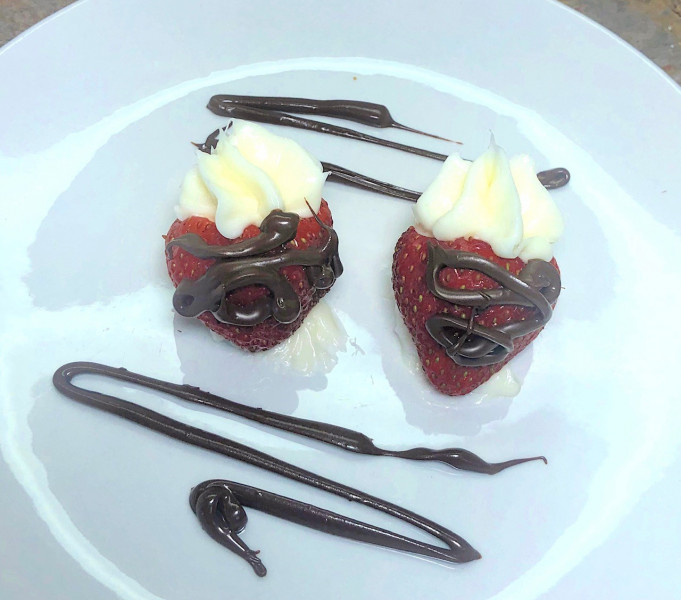
Taco Topper: Sour Cream
We love sour cream as a topping for tacos but spooning it onto the length of a narrow taco is quite a challenge and you often wind up with a gloppy mess. Enter the freezer bag filled with sour cream! Just cut away one corner of the bag and you can now easily pipe in a narrow, perfect stripe of sour cream right down the length of your taco shell.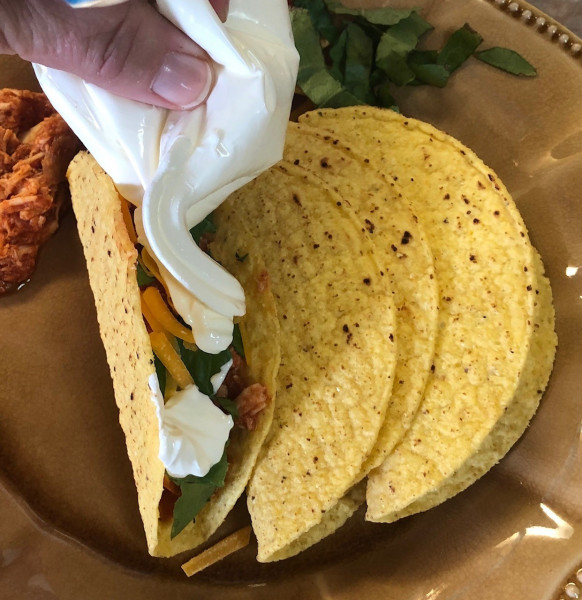
Turn a Chicken Breast into a Cutlet for Quicker Cooking
Flattening chicken breasts into cutlets is a great way to speed up the cooking time but doing this on a cutting board is often a messy task that requires a lot of sanitizing and clean up. Instead, place the chicken breast into a gallon freezer bag, pressing out all the air, then seal the bag securely. Using the flat side of a kitchen mallet, whack the chicken breast until it is evenly flattened and thin, using your free hand to feel the top of the chicken breast as you go, learning where you need to pound next. The bag prevents the chicken from splattering all over your kitchen and work area, plus it makes the cutting board and mallet much easier to sanitize afterwards.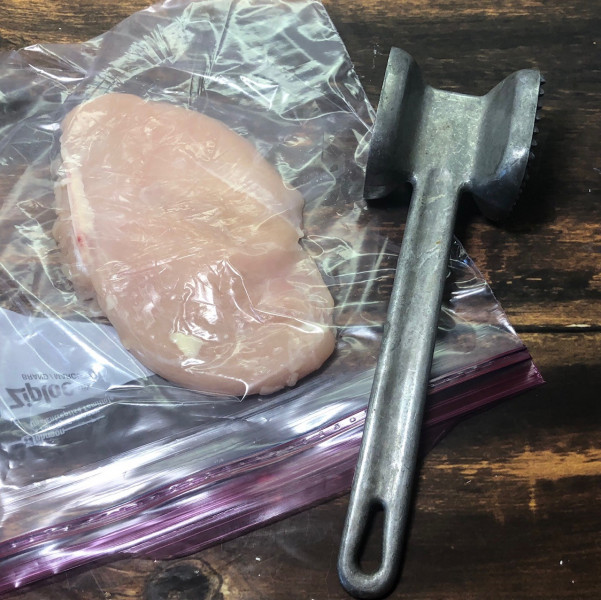
Marinating Bag
Marinating meats in a freezer bag works beautifully if you use the 2-step method: First, place the meat into the bag, pouring in the prepared marinade next; press out the air and securely seal the bag. Secondly, place the bag of meat and marinade into a deep, rather narrow bowl. The bowl ensures the meat stays submerged in the marinade because it holds it upright, and also ensures that if the bag leaks, the mess stays contained in the bowl, not all over your fridge.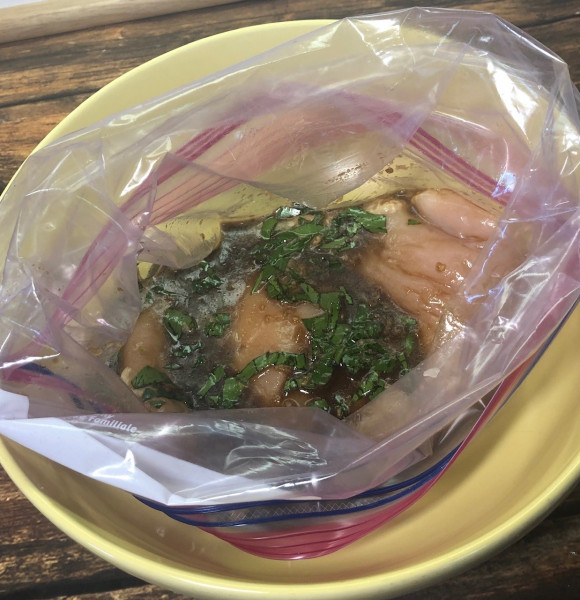
Brining Bag
Brining is a technique that many home cooks have adopted, me included. Brining is the process of submerging a cut of meat in a brine solution, which is simply water that’s been saturated with salt. As it brines, meat absorbs extra liquid and salt, resulting in a juicier and more flavorful eating experience. This technique is particularly great for lean cuts of meat that tend to dry out during cooking, such as Thanksgiving turkey, chicken breasts and pork chops. Brining in a freezer bag works great using the 2-step method as directed above for marinating. FYI - The length of time for brining varies. For smaller items like pork chops and chicken breasts go with 3-4 hours, a turkey can brine for up to 24 hours.)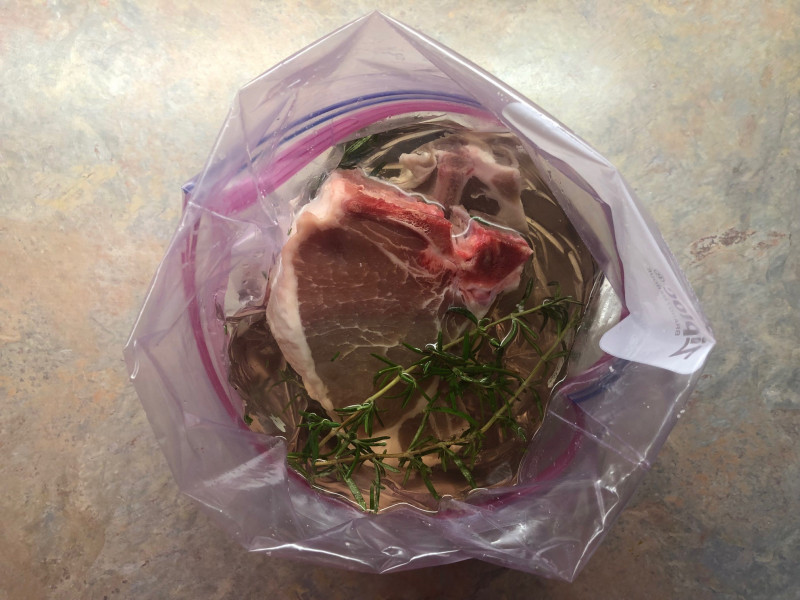
Crushing Bag
Crushing butter crackers for a quiche crust or chocolate sandwich cookies to make ice cream cake filling can be a messy task.... unless you keep those crackers or cookies contained within a gallon bag as you crush them. After you add what you’d like to crush to the bag, press out all the air and seal the bag; gently use your favorite rolling pin to roll over the ingredients inside. Manipulate the bag to rearrange the ingredients, then take another run with the rolling pin. In a matter of a few seconds, you have finely crushed crumbs, as desired.
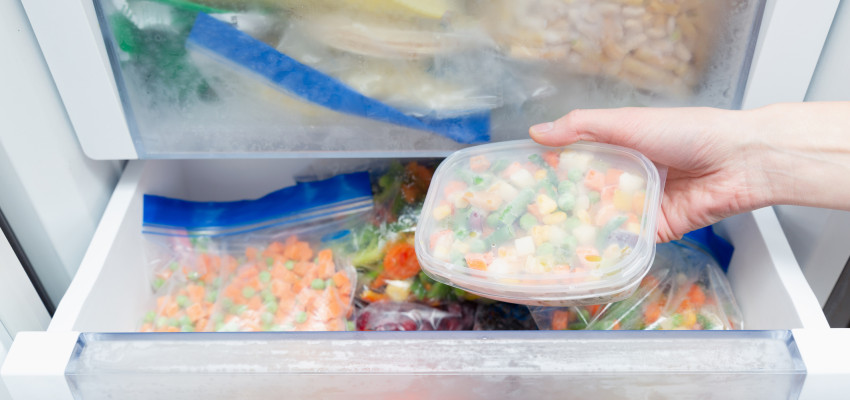
Stackable Freezer Meals
The beauty of preparing freezer meals and then strategically placing those ingredients into a gallon freezer bag is this: flatten, flatten, flatten! After you’ve added the ingredients, securely seal the bag, then gently press the ingredients into every corner of the bag, placing it into the freezer where it can lay flat and freeze evenly. Once these meal bags are frozen, you can easily stack them up on top of each other or even turn them upright to store side-by-side, optimizing your freezer space much more efficiently.
Make Homemade Cookie Dough Available for Easy Baking Anytime
Keeping frozen cookie dough available in your freezer makes baking fresh homemade cookies quick and easy, also allowing you to bake as few or as many at a time as you’d like. Prepare the cookie dough as directed by the chosen recipe, then use your cookie dough scoop to portion out all the dough onto a baking sheet, placing every portion side-by-side, but not touching each other. Place the sheet of cookie dough balls into the freezer; once the cookie dough balls are frozen solid, place them into gallon or quart freezer bags for storage in the freezer. I like to write the baking time and oven temperature right on the freezer bag so any family baker (usually me!) can easily see what to do when they grab cookie dough from the bag to bake it.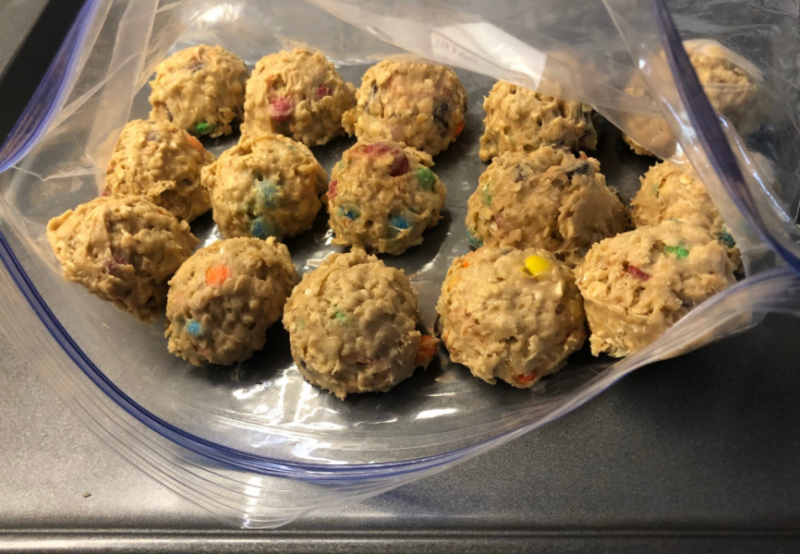
Cooking-in-Bulk Bags
We love muffins, pancakes and French toast at our house, no doubt about it. I’ve found it’s super easy to double the recipe, feeding my family one batch, then cooking the second batch to freeze for later use on busy, hectic mornings. Make the muffins, pancakes and French toast as usual, letting them fully cool on cooking racks. Next, place the pastries into quart bags in individual servings. This makes it handy for family members to grab a bag from the freezer as they need it and rewarming in a toaster or micorwave. This practice saves your food budget tons of money.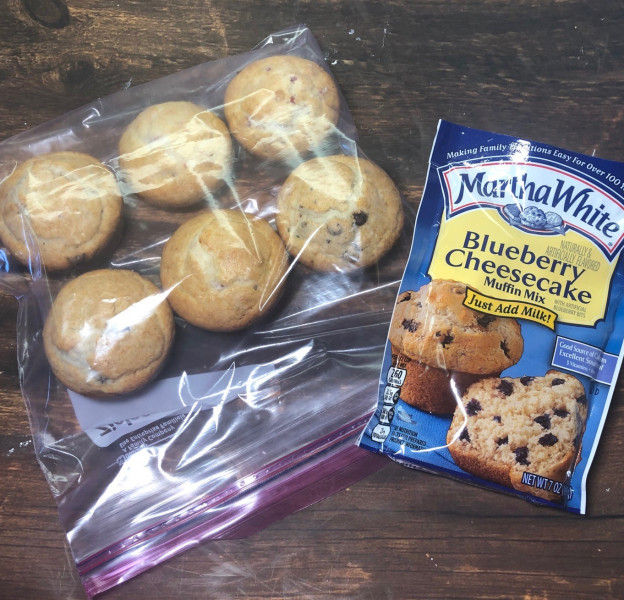
Freeze Individual Servings of Soup
Freezer bags also work great for double batches of soup or leftover soups that are frozen into individual servings for grab-and-go days. Ladle the soup into plastic or paper cups and place them into the freezer. Once the soup is frozen, remove the cups, storing the soup in individual freezer bags. Just reheat in the microwave or on the stove top to eat when you’re hungry for something warm and filling.
Fat-From-Broth Separator
This is one of my very favorite ways of utilizing a gallon bag in the kitchen. Let’s say you want to separate the cooking liquids from the fat after making a chuck roast so you can make pan gravy. Once the cooking liquids have cooled to room temperature, pour them to a gallon-size freezer bag, pushing them to one side of the bag and down into the corner. (See the photo to view what I mean.) Now, wait a few moments, watching the liquids in the bag as you see the fats almost immediately work their way to the top. You will clearly be able to see the layer of fat above the pan juices below. Find a very large bowl and place it in your sink. Holding the bag of pan juices over the bowl, quickly make an incision in the bag near the very tip, allowing the pan juices to run out and into your bowl. As the layer of fat from the top makes its way towards the exit, grab the corner of the bag with your fingers, pinching off the hole, keeping the fat contained within, not in the pan juices that are now in your bowl. Now you can make pan gravy with the juices that are in the bowl - easy, peasy.
**Please note: When you make the incision in the corner of the gallon bag to let the pan juices flow out and into the bowl, be sure you don’t completely cut off the corner of the bag, since the corner will likely fall right into your bowl of pan juices and it can be pretty difficult to find it to fish it out.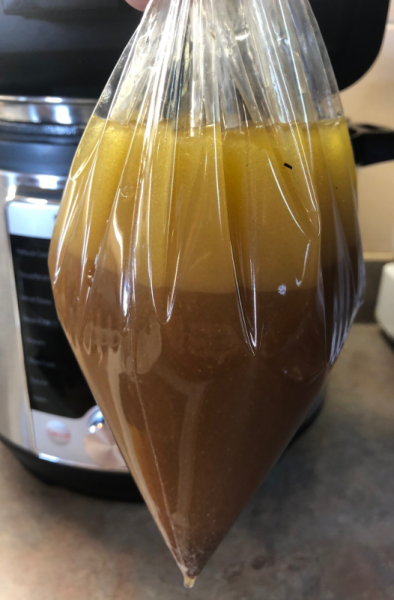
Scoopably-Soft Ice Cream
If you’re one of those weird people who loves soft ice cream (not me!), you’ll appreciate this gallon bag hack. Place your carton of ice cream into a gallon freezer bag, pressing out all the air before tightly sealing it to be stored in the freezer. The freezer bag protects the ice cream from oxygen, preventing ice crystals from forming on the surface, ensuring your ice cream will stay creamy and scoopable.
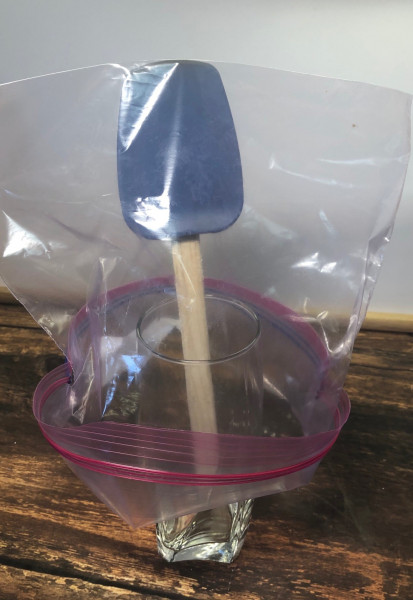
Bonus Tip: Can Freezer Bags Be Re-Used?
Why, certainly! Other than bags that have contained meats and marinades or brines (these need to be tossed), freezer bags can be washed and re-used. Simply wash the interior of the bag with hot, soapy water, rinsing it well. Next, turn the bag inside out and place it over a wooden spoon that has been placed into a tall glass. Let the bag air dry on your counter then turn it right-side-out again to reuse as needed.